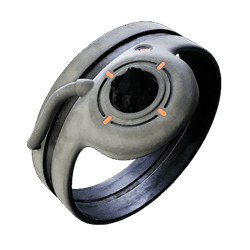
Focusing Shard

Ring

focused jewel rings remnant2 wiki guide 250px
Reduce Recoil by 50%. Aiming Down Sights gradually reduces Spread by 70% over 4s


Focusing Shard is a Ring and accessory in Remnant 2. Focusing Shard is a prestigious ring that grants exceptional combat prowess. Reduce Recoil by 50%. Aiming Down Sights gradually reduces Spread by 70% over 4s


 Like all Drzyr. the Phetyr class maintained a singular focus. They did not waste time or energy on anything that did not help them archieve their goal. Even downtime was only enjoyed for the purpose of recovery. with the end result of preparing them to fight bettter afterwards.


Focusing Shard Effect in Remnant 2

Focusing Shard provides the following effect:

  • Reduce Recoil by 50%. Aiming Down Sights gradually reduces Spread by 70% over 4s


Remnant 2 Focusing Shard Location

Focusing Shard can be found at the following locations:

Found in the final train car guarded by Robot Grunts. In order to reach it, players must make their way behind the car, through the pit with the Ring of Deflection and the Vortex Sphere.

Remnant 2 Focusing Shard Builds

Focusing Shard is used in the following Builds:

__builds__


Remnant 2 __name__ Notes & Trivia

  • __description__
  • Rings grant players diverse benefits once donned, up to 4 rings may be equipped at a time. 
  • Notes, Tips, and Trivia for __name__ in Remnant 2 go here.


All Rings in Remnant 2
A'taerii Booster  ♦  Acid Stone  ♦  Ahanae Crystal  ♦  Akari War Band  ♦  Alchemy Stone  ♦  Alumni Ring  ♦  Amber Moonstone  ♦  Anastasija's Inspiration  ♦  Archer's Crest  ♦  Assassin's Seal  ♦  Atonement Fold  ♦  Band Band  ♦  Band of Accord  ♦  Band Of The Fanatic  ♦  Berserker's Crest  ♦  Bisected Ring  ♦  Bitter Memento  ♦  Black Cat Band  ♦  Black Pawn Stamp  ♦  Black Spinel  ♦  Blackout Ring  ♦  Blasting Cap Ring  ♦  Blessed Ring  ♦  Blood Jewel  ♦  Blood Tinged Ring  ♦  Bloodless King's Vow  ♦  Booster Ring  ♦  Braided Thorns  ♦  Brawler's Pride  ♦  Bridge Wardens Crest  ♦  Bright Steel Ring  ♦  Burden Of Departed  ♦  Burden of the Audacious  ♦  Burden of the Departed  ♦  Burden of the Destroyer  ♦  Burden of the Divine  ♦  Burden of the Follower  ♦  Burden of the Gambler  ♦  Burden of the Mariner  ♦  Burden of the Mason  ♦  Burden of the Mesmer  ♦  Burden of the Rebel  ♦  Burden Of The Sciolist  ♦  Burden of the Stargazer  ♦  Burden of the Warlock  ♦  Captain's Insignia  ♦  Cataloger's Jewel  ♦  Celerity Stone  ♦  Closed Loop  ♦  Compulsion Loop  ♦  Conjurer's Circle  ♦  Conservation Seal  ♦  Constant Variable Ring  ♦  Crimson Dreamstone  ♦  Dark Sea Armada Crest  ♦  Dead King's Memento  ♦  Deceiver's Band  ♦  Deep Pocket Ring  ♦  Defensive Action Loop  ♦  Dense Silicon Ring  ♦  Devoured Loop  ♦  Digested Hog Lure  ♦  Downgraded Ring  ♦  Drakestone Pearl  ♦  Dran Memento  ♦  Dran Scavenger Sigil  ♦  Drawn Scavenger Ring  ♦  Dread Font  ♦  Dried Clay Ring  ♦  Drzyr Sniper Sigil  ♦  Dying Ember  ♦  Elevated Ring  ♦  Embrace of Sha'Hala  ♦  Encrypted Ring  ♦  Endaira's Endless Loop  ♦  Excess Coil  ♦  Fae Bruiser Ring  ♦  Fae Hunter Ring  ♦  Fae Protector Signet  ♦  Fae Shaman Ring  ♦  Fae Warrior Ring  ♦  Faelin's Sigil  ♦  Faerin's Sigil  ♦  Feastmaster's Signet  ♦  Feathery Binding  ♦  Feedback Loop  ♦  Fire Stone  ♦  Floodlit Diamond  ♦  Flyweight's Sting  ♦  Focused Jewel  ♦  Frivolous Band  ♦  Galvanized Resupply Band  ♦  Game Master's Pride  ♦  Generating Band  ♦  Grounding Stone  ♦  Guardian's Ring  ♦  Gul Signet  ♦  Gunslinger's Ring  ♦  Hardcore Metal Band  ♦  Hardened Coil  ♦  Haymaker's Ring  ♦  Heart of the Wolf  ♦  Hex Ward  ♦  Jewel Of The Beholden  ♦  Kinetic Cycle Stone  ♦  Kolket Eyelet  ♦  Leaking Gemstone  ♦  Lighthouse Keeper's Ring  ♦  Lighthouse Keepers Ring  ♦  Lithic Signet  ♦  Lodestone Ring  ♦  Low Yield Recovery Ring  ♦  Mark of the Destroyer  ♦  Matriarch's Ring  ♦  Mechanic's Cog  ♦  Metal Driver  ♦  Meteorite Shard Ring  ♦  Microcompressor  ♦  Momentum Driver  ♦  Offering Stone  ♦  Outcast Ring  ♦  Painless Obsidian  ♦  Pan War Band  ♦  Point Focus Ring  ♦  Power Complex  ♦  Power Saver  ♦  Probability Cord  ♦  Propulsion Loop  ♦  Provisioner Ring  ♦  Rally Band  ♦  Ravager's Bargain  ♦  Reaping Stone  ♦  Red Ring Of Death  ♦  Rerouting Cable  ♦  Reserve Boosting Gem  ♦  Restriction Cord  ♦  Ring of Crisis  ♦  Ring Of Deflection  ♦  Ring of Diversion  ♦  Ring of Flawed Beauty  ♦  Ring of Grace  ♦  Ring Of Infinite Damage  ♦  Ring of Omens  ♦  Ring of Ordnance  ♦  Ring Of Restocking  ♦  Ring Of Retribution  ♦  Ring of Spirits  ♦  Ring Of The Castaway  ♦  Ring of the Damned  ♦  Ring of the Forest Spirit  ♦  Ring of the Robust  ♦  Ring Of The Vain  ♦  Rock of Anguish  ♦  Rotward  ♦  Rusted Heirloom  ♦  Sagestone  ♦  Sapphire Dreamstone  ♦  Seal of the Empress  ♦  Sealed Resin Loop  ♦  Shadow Of Misery  ♦  Shaed Stone  ♦  Shard Banded Ring  ♦  Shiny Hog Lure  ♦  Singed Ring  ♦  Slayer's Crest  ♦  Soul Feast  ♦  Soul Guard  ♦  Soul Link  ♦  Soul Shard  ♦  Spirit Stone  ♦  Stockpile Charger  ♦  Stone of Balance  ♦  Stone of Continuance  ♦  Stone of Expanse  ♦  Stone Of Malevolence  ♦  Stream Coupler  ♦  Strong Arm Band  ♦  Subterfuge Link  ♦  Suppression Ward  ♦  Targeting Jewel  ♦  Tarnished Ring  ♦  Tear of Kaeula  ♦  Tear of Lydusa  ♦  Tempest Conduit  ♦  Thalos Eyelet  ♦  Tightly Wound Coil  ♦  Timekeeper's Jewel  ♦  Token of Favor  ♦  Tomb Dweller's Ring  ♦  Vacuum Seal  ♦  Vestige of Power  ♦  Wax Sealed Ring  ♦  White Glass Bead  ♦  White Pawn Stamp  ♦  Wind Hollow Circlet  ♦  Wood Ring  ♦  Worn Admiral's Ring  ♦  Zania's Malice  ♦  Zohee's Ring


Tired of anon posting? Register!
    • The gravity orb doesn't start following you until you pick up the ring that's in front of it (in my case it was the Ring of Deflection). You can skip the orb and grab the Focusing Shard first so you aren't chased by the orb, then come back and grab the ring.

    Load more
    ⇈ ⇈