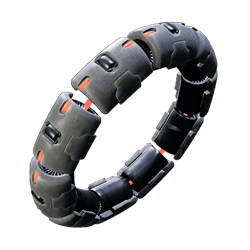
Generating Band

Ring

generating band rings remnant2 wiki guide 250px
Regenerate 3% of Max Health per second while a Shield is active.


Generating Band is a Ring and accessory in Remnant 2. Generating Band is a ring that was used by Drzyr engineers near the artificial star at N'Erud's center for survival. It regenerates health while a shield is active.


The source of N'Erud's power is not a natural phenomenon. It is a replica, a miniaturized version of the star that once warmed our homeworld. Creating a star --however small--is no mean feat, but we believed that if we could do so, then there was nothing we could not accomplish.
We were almost correct.


Generating Band Effect in Remnant 2

Generating Band provides the following effect:

  • Regenerate 3% of Max Health per second while a Shield is active.


Remnant 2 Generating Band Location

Generating Band can be found at the following locations:


Remnant 2 Generating Band Builds

Generating Band is used in the following Builds:

__builds__


Remnant 2 Generating Band Notes & Trivia

  • Drzyr engineers used bands like these to work near the artifical star at N'Erud's center. It was the only way a living being could survive its radiation.
  • Rings grant players diverse benefits once donned, up to 4 rings may be equipped at a time. 
  • Notes, Tips, and Trivia for Generating Band in Remnant 2 go here.


All Rings in Remnant 2
A'taerii Booster  ♦  Acid Stone  ♦  Ahanae Crystal  ♦  Akari War Band  ♦  Alchemy Stone  ♦  Alumni Ring  ♦  Amber Moonstone  ♦  Anastasija's Inspiration  ♦  Archer's Crest  ♦  Assassin's Seal  ♦  Atonement Fold  ♦  Band Band  ♦  Band of Accord  ♦  Band Of The Fanatic  ♦  Berserker's Crest  ♦  Bisected Ring  ♦  Bitter Memento  ♦  Black Cat Band  ♦  Black Pawn Stamp  ♦  Black Spinel  ♦  Blackout Ring  ♦  Blasting Cap Ring  ♦  Blessed Ring  ♦  Blood Jewel  ♦  Blood Tinged Ring  ♦  Bloodless King's Vow  ♦  Booster Ring  ♦  Braided Thorns  ♦  Brawler's Pride  ♦  Bridge Wardens Crest  ♦  Bright Steel Ring  ♦  Burden Of Departed  ♦  Burden of the Audacious  ♦  Burden of the Departed  ♦  Burden of the Destroyer  ♦  Burden of the Divine  ♦  Burden of the Follower  ♦  Burden of the Gambler  ♦  Burden of the Mariner  ♦  Burden of the Mason  ♦  Burden of the Mesmer  ♦  Burden of the Rebel  ♦  Burden Of The Sciolist  ♦  Burden of the Stargazer  ♦  Burden of the Warlock  ♦  Captain's Insignia  ♦  Cataloger's Jewel  ♦  Celerity Stone  ♦  Closed Loop  ♦  Compulsion Loop  ♦  Conjurer's Circle  ♦  Conservation Seal  ♦  Constant Variable Ring  ♦  Crimson Dreamstone  ♦  Dark Sea Armada Crest  ♦  Dead King's Memento  ♦  Deceiver's Band  ♦  Deep Pocket Ring  ♦  Defensive Action Loop  ♦  Dense Silicon Ring  ♦  Devoured Loop  ♦  Digested Hog Lure  ♦  Downgraded Ring  ♦  Drakestone Pearl  ♦  Dran Memento  ♦  Dran Scavenger Sigil  ♦  Drawn Scavenger Ring  ♦  Dread Font  ♦  Dried Clay Ring  ♦  Drzyr Sniper Sigil  ♦  Dying Ember  ♦  Elevated Ring  ♦  Embrace of Sha'Hala  ♦  Encrypted Ring  ♦  Endaira's Endless Loop  ♦  Excess Coil  ♦  Fae Bruiser Ring  ♦  Fae Hunter Ring  ♦  Fae Protector Signet  ♦  Fae Shaman Ring  ♦  Fae Warrior Ring  ♦  Faelin's Sigil  ♦  Faerin's Sigil  ♦  Feastmaster's Signet  ♦  Feathery Binding  ♦  Feedback Loop  ♦  Fire Stone  ♦  Floodlit Diamond  ♦  Flyweight's Sting  ♦  Focused Jewel  ♦  Focusing Shard  ♦  Frivolous Band  ♦  Galvanized Resupply Band  ♦  Game Master's Pride  ♦  Grounding Stone  ♦  Guardian's Ring  ♦  Gul Signet  ♦  Gunslinger's Ring  ♦  Hardcore Metal Band  ♦  Hardened Coil  ♦  Haymaker's Ring  ♦  Heart of the Wolf  ♦  Hex Ward  ♦  Jewel Of The Beholden  ♦  Kinetic Cycle Stone  ♦  Kolket Eyelet  ♦  Leaking Gemstone  ♦  Lighthouse Keeper's Ring  ♦  Lighthouse Keepers Ring  ♦  Lithic Signet  ♦  Lodestone Ring  ♦  Low Yield Recovery Ring  ♦  Mark of the Destroyer  ♦  Matriarch's Ring  ♦  Mechanic's Cog  ♦  Metal Driver  ♦  Meteorite Shard Ring  ♦  Microcompressor  ♦  Momentum Driver  ♦  Offering Stone  ♦  Outcast Ring  ♦  Painless Obsidian  ♦  Pan War Band  ♦  Point Focus Ring  ♦  Power Complex  ♦  Power Saver  ♦  Probability Cord  ♦  Propulsion Loop  ♦  Provisioner Ring  ♦  Rally Band  ♦  Ravager's Bargain  ♦  Reaping Stone  ♦  Red Ring Of Death  ♦  Rerouting Cable  ♦  Reserve Boosting Gem  ♦  Restriction Cord  ♦  Ring of Crisis  ♦  Ring Of Deflection  ♦  Ring of Diversion  ♦  Ring of Flawed Beauty  ♦  Ring of Grace  ♦  Ring Of Infinite Damage  ♦  Ring of Omens  ♦  Ring of Ordnance  ♦  Ring Of Restocking  ♦  Ring Of Retribution  ♦  Ring of Spirits  ♦  Ring Of The Castaway  ♦  Ring of the Damned  ♦  Ring of the Forest Spirit  ♦  Ring of the Robust  ♦  Ring Of The Vain  ♦  Rock of Anguish  ♦  Rotward  ♦  Rusted Heirloom  ♦  Sagestone  ♦  Sapphire Dreamstone  ♦  Seal of the Empress  ♦  Sealed Resin Loop  ♦  Shadow Of Misery  ♦  Shaed Stone  ♦  Shard Banded Ring  ♦  Shiny Hog Lure  ♦  Singed Ring  ♦  Slayer's Crest  ♦  Soul Feast  ♦  Soul Guard  ♦  Soul Link  ♦  Soul Shard  ♦  Spirit Stone  ♦  Stockpile Charger  ♦  Stone of Balance  ♦  Stone of Continuance  ♦  Stone of Expanse  ♦  Stone Of Malevolence  ♦  Stream Coupler  ♦  Strong Arm Band  ♦  Subterfuge Link  ♦  Suppression Ward  ♦  Targeting Jewel  ♦  Tarnished Ring  ♦  Tear of Kaeula  ♦  Tear of Lydusa  ♦  Tempest Conduit  ♦  Thalos Eyelet  ♦  Tightly Wound Coil  ♦  Timekeeper's Jewel  ♦  Token of Favor  ♦  Tomb Dweller's Ring  ♦  Vacuum Seal  ♦  Vestige of Power  ♦  Wax Sealed Ring  ♦  White Glass Bead  ♦  White Pawn Stamp  ♦  Wind Hollow Circlet  ♦  Wood Ring  ♦  Worn Admiral's Ring  ♦  Zania's Malice  ♦  Zohee's Ring


Tired of anon posting? Register!
    • Anonymous

      Just so people know, the ring is working as intended. When going off of base health (100), 3% of your health is 3 health.

      The fact that it goes off of a percentage makes this ring stronger than you might realize since the healing will always be able to keep up with your health, no matter how large your health pool can become (as opposed to something like Wellspring or most Relics).

      • Anonymous

        description says 3% per sec but the buff u get displays 3 hp/sec when hovered over.
        still good. maybe they fix description or make it do 3% hp/sec which would be awesome.

        • Anonymous

          This is the layout of the flooded room event. You only have one chance to take the items in that room, once flooded again you can't do anything.

          https://i.ibb.co/HtRpdK2/image.png

          • I also forgot to mention that AFAIK this Flooded Room Event will only spawn in indoor dungeons that have humanoid/robotic enemies. Meaning it will never spawn in outdoor dungeons like the Terminus Station. And it will never spawn in dungeons with those insect looking enemies either. Unless there are screenshots that prove me otherwise I would recommend not wasting any time on those dungeons if you wish to farm for this event.

            • This ring is guaranteed be found as the third item you pick up in the The Flooded Room Event where you attempt to race against time to climb many obstacles back up before the rising water kills you (the first two items are Insulation Driver and Expiring Stone/Subterfuge Link). It's definitely possible to get all 3 items solo without dying but you may want to consider respeccing into full mobility before attempting it. Swiftness and Wayfarer traits as well as mobility rings/concoctions will help you tremendously. Once the water reaches the top you cannot go back in anymore.

              • I found this in Vault of the Formless tonight after farming Putrid Domain for hours with nothing to show. I had actually given up and started trying to farm a different ring altogether. Go figure.

              Load more
              ⇈ ⇈