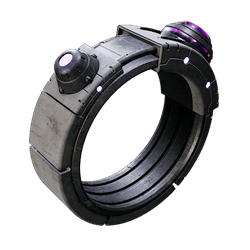
Microcompressor

Ring

microcompressor rings remnant2 wiki guide 250px
Reduces Heat Generation when firing weapons that Overheat by -30%. Increases Heat Reduction Rate by 30%.


Microcompressor is a Ring and accessory in Remnant 2. Microcompressor is a technologically advanced ring designed for cooling weapons without physical contact. Its complex workings, born out of the need to disperse immense heat, reduce heat generation when firing overheating weapons and enhance heat reduction rate.


The workings of my chamber are complex, but the primary mechanism was heat dispersion. The Seat of Creation generates more heat than anything in the universe, and while N'Erud is protected against such simple forces, when this heat combined with other energies, N'Erud''s measures proved insufficient to save the people within.


Microcompressor Effect in Remnant 2

Microcompressor provides the following effect:

  • Reduces Heat Generation when firing weapons that Overheat by -30%. Increases Heat Reduction Rate by 30%.


Remnant 2 Microcompressor Location

Microcompressor can be found at the following locations:


Remnant 2 Microcompressor Builds

Microcompressor is used in the following Builds:

__builds__


Remnant 2 Microcompressor Notes & Trivia

  • Finally, technology that makes some kind of sense. Of course such a vast machine would needs means of cooling itself.
    But uh... How does it cool your weapons when it's not even touching them?
  • Rings grant players diverse benefits once donned, up to 4 rings may be equipped at a time. 
  • Notes, Tips, and Trivia for Microcompressor in Remnant 2 go here.


All Rings in Remnant 2
A'taerii Booster  ♦  Acid Stone  ♦  Ahanae Crystal  ♦  Akari War Band  ♦  Alchemy Stone  ♦  Alumni Ring  ♦  Amber Moonstone  ♦  Anastasija's Inspiration  ♦  Archer's Crest  ♦  Assassin's Seal  ♦  Atonement Fold  ♦  Band Band  ♦  Band of Accord  ♦  Band Of The Fanatic  ♦  Berserker's Crest  ♦  Bisected Ring  ♦  Bitter Memento  ♦  Black Cat Band  ♦  Black Pawn Stamp  ♦  Black Spinel  ♦  Blackout Ring  ♦  Blasting Cap Ring  ♦  Blessed Ring  ♦  Blood Jewel  ♦  Blood Tinged Ring  ♦  Bloodless King's Vow  ♦  Booster Ring  ♦  Braided Thorns  ♦  Brawler's Pride  ♦  Bridge Wardens Crest  ♦  Bright Steel Ring  ♦  Burden Of Departed  ♦  Burden of the Audacious  ♦  Burden of the Departed  ♦  Burden of the Destroyer  ♦  Burden of the Divine  ♦  Burden of the Follower  ♦  Burden of the Gambler  ♦  Burden of the Mariner  ♦  Burden of the Mason  ♦  Burden of the Mesmer  ♦  Burden of the Rebel  ♦  Burden Of The Sciolist  ♦  Burden of the Stargazer  ♦  Burden of the Warlock  ♦  Captain's Insignia  ♦  Cataloger's Jewel  ♦  Celerity Stone  ♦  Closed Loop  ♦  Compulsion Loop  ♦  Conjurer's Circle  ♦  Conservation Seal  ♦  Constant Variable Ring  ♦  Crimson Dreamstone  ♦  Dark Sea Armada Crest  ♦  Dead King's Memento  ♦  Deceiver's Band  ♦  Deep Pocket Ring  ♦  Defensive Action Loop  ♦  Dense Silicon Ring  ♦  Devoured Loop  ♦  Digested Hog Lure  ♦  Downgraded Ring  ♦  Drakestone Pearl  ♦  Dran Memento  ♦  Dran Scavenger Sigil  ♦  Drawn Scavenger Ring  ♦  Dread Font  ♦  Dried Clay Ring  ♦  Drzyr Sniper Sigil  ♦  Dying Ember  ♦  Elevated Ring  ♦  Embrace of Sha'Hala  ♦  Encrypted Ring  ♦  Endaira's Endless Loop  ♦  Excess Coil  ♦  Fae Bruiser Ring  ♦  Fae Hunter Ring  ♦  Fae Protector Signet  ♦  Fae Shaman Ring  ♦  Fae Warrior Ring  ♦  Faelin's Sigil  ♦  Faerin's Sigil  ♦  Feastmaster's Signet  ♦  Feathery Binding  ♦  Feedback Loop  ♦  Fire Stone  ♦  Floodlit Diamond  ♦  Flyweight's Sting  ♦  Focused Jewel  ♦  Focusing Shard  ♦  Frivolous Band  ♦  Galvanized Resupply Band  ♦  Game Master's Pride  ♦  Generating Band  ♦  Grounding Stone  ♦  Guardian's Ring  ♦  Gul Signet  ♦  Gunslinger's Ring  ♦  Hardcore Metal Band  ♦  Hardened Coil  ♦  Haymaker's Ring  ♦  Heart of the Wolf  ♦  Hex Ward  ♦  Jewel Of The Beholden  ♦  Kinetic Cycle Stone  ♦  Kolket Eyelet  ♦  Leaking Gemstone  ♦  Lighthouse Keeper's Ring  ♦  Lighthouse Keepers Ring  ♦  Lithic Signet  ♦  Lodestone Ring  ♦  Low Yield Recovery Ring  ♦  Mark of the Destroyer  ♦  Matriarch's Ring  ♦  Mechanic's Cog  ♦  Metal Driver  ♦  Meteorite Shard Ring  ♦  Momentum Driver  ♦  Offering Stone  ♦  Outcast Ring  ♦  Painless Obsidian  ♦  Pan War Band  ♦  Point Focus Ring  ♦  Power Complex  ♦  Power Saver  ♦  Probability Cord  ♦  Propulsion Loop  ♦  Provisioner Ring  ♦  Rally Band  ♦  Ravager's Bargain  ♦  Reaping Stone  ♦  Red Ring Of Death  ♦  Rerouting Cable  ♦  Reserve Boosting Gem  ♦  Restriction Cord  ♦  Ring of Crisis  ♦  Ring Of Deflection  ♦  Ring of Diversion  ♦  Ring of Flawed Beauty  ♦  Ring of Grace  ♦  Ring Of Infinite Damage  ♦  Ring of Omens  ♦  Ring of Ordnance  ♦  Ring Of Restocking  ♦  Ring Of Retribution  ♦  Ring of Spirits  ♦  Ring Of The Castaway  ♦  Ring of the Damned  ♦  Ring of the Forest Spirit  ♦  Ring of the Robust  ♦  Ring Of The Vain  ♦  Rock of Anguish  ♦  Rotward  ♦  Rusted Heirloom  ♦  Sagestone  ♦  Sapphire Dreamstone  ♦  Seal of the Empress  ♦  Sealed Resin Loop  ♦  Shadow Of Misery  ♦  Shaed Stone  ♦  Shard Banded Ring  ♦  Shiny Hog Lure  ♦  Singed Ring  ♦  Slayer's Crest  ♦  Soul Feast  ♦  Soul Guard  ♦  Soul Link  ♦  Soul Shard  ♦  Spirit Stone  ♦  Stockpile Charger  ♦  Stone of Balance  ♦  Stone of Continuance  ♦  Stone of Expanse  ♦  Stone Of Malevolence  ♦  Stream Coupler  ♦  Strong Arm Band  ♦  Subterfuge Link  ♦  Suppression Ward  ♦  Targeting Jewel  ♦  Tarnished Ring  ♦  Tear of Kaeula  ♦  Tear of Lydusa  ♦  Tempest Conduit  ♦  Thalos Eyelet  ♦  Tightly Wound Coil  ♦  Timekeeper's Jewel  ♦  Token of Favor  ♦  Tomb Dweller's Ring  ♦  Vacuum Seal  ♦  Vestige of Power  ♦  Wax Sealed Ring  ♦  White Glass Bead  ♦  White Pawn Stamp  ♦  Wind Hollow Circlet  ♦  Wood Ring  ♦  Worn Admiral's Ring  ♦  Zania's Malice  ♦  Zohee's Ring


Tired of anon posting? Register!
    • Anonymous

      Whilst it may seem natural to pair this ring together with the Constant Variable Ring it's actually lower dps when you have both on; since one wants you to be in high heat to give you a damage boost and the other reduces heat generation and speeds up the rate at which heat goes down. In other words they're almost anti synergistic with each other.

      I use this with the Bonesaw and Constant Variable with Plasma Cutter.

      • Anonymous

        I use this gun with the Plasma Cutter and it is a wonderful combo. Between this ring and the Plasma Cutter mod, you can easily generate a constant 1000 DPS, and that's without even combining it with additional rings and amulets, which easily takes your DPS even higher.

        • Anonymous

          So which guns benefit from this and constant variable's effects? I know of Bonesaw and Cube Gun, but what else?

          • Anonymous

            I found out that in practice this ring almost doubles your effective heat management / fire rate with heat-generating weapons.

            I did the maths, 30% heat reduction is 70% heat generated. That means you have 1/0.7 = 1.42 effective heat bar. Or in other words you can fire 42% longer before getting overheated.
            This was tested in game (Bonesaw, overheat on ~75th bullet in mag instead of ~100th, out of 150 bullets).
            Now to the best part, the 30% increase in decay rate is applied to the same, 142% effective heat bar. Which means 1.42 x 1.3 = 1.84 effective heat decay. In other words, 84% faster heat decay than without the ring.

          Load more
          ⇈ ⇈